Getting Started
![]()
Event Sourcing
Event Sourcing is architecting for tomorrow's questions. Which is essential as today's decisions are tomorrow's context. We keep all the facts that happened in our system. Facts are stored as events that can be used to make decisions, fine-tune read models, integrate our systems, and enhance our analytics and tracking. All in one package, wash and go!
This simple pattern allows easier integration, building applications from smaller building blocks, keeping the cognitive load and coupling on a leash.
Yet, some say that's complex and complicated; Emmett aims to prove that it doesn't have to be like that. We cut the boilerplate and layered madness, letting you focus on delivery. We're opinionated but focus on composition, not magic. Let me show you how.
Installation
Before we dive into the real world's scenario, let's add Emmett to your project, as we'll use its types and tooling to streamline the development effort.
I assume that you have Node.js installed. Add the package from the terminal using your favourite package manager:
$ npm add @event-driven-io/emmett$ pnpm add @event-driven-io/emmett$ yarn add @event-driven-io/emmett$ bun add @event-driven-io/emmettEvents
Events are the centrepiece of event-sourced systems. They represent both critical points of the business process but are also used as the state. That enables you to reflect your business into the code better, getting the synergy. Let's model a simple business process: a shopping cart. You can open it, add or remove the product from it and confirm or cancel.
We could define it as follows:
import type { Event } from '@event-driven-io/emmett';

export type ProductItemAddedToShoppingCart = Event<
  'ProductItemAddedToShoppingCart',
  {
    shoppingCartId: string;
    productItem: PricedProductItem;
    addedAt: Date;
  }
>;

export type ProductItemRemovedFromShoppingCart = Event<
  'ProductItemRemovedFromShoppingCart',
  {
    shoppingCartId: string;
    productItem: PricedProductItem;
    removedAt: Date;
  }
>;

export type ShoppingCartConfirmed = Event<
  'ShoppingCartConfirmed',
  {
    shoppingCartId: string;
    confirmedAt: Date;
  }
>;

export type ShoppingCartCancelled = Event<
  'ShoppingCartCancelled',
  {
    shoppingCartId: string;
    canceledAt: Date;
  }
>;

export type ShoppingCartEvent =
  | ProductItemAddedToShoppingCart
  | ProductItemRemovedFromShoppingCart
  | ShoppingCartConfirmed
  | ShoppingCartCancelled;

export interface ProductItem {
  productId: string;
  quantity: number;
}

export type PricedProductItem = ProductItem & {
  unitPrice: number;
};
It shows that clients can add or remove products to our shopping cart and confirm or cancel them. All events represent facts that happened and tell the story of the shopping cart. To highlight that, we're grouping all type definitions with the ShoppingCartEvent union type. It tells that either of those events may happen.
We're using Event type, which helps to keep the event definition aligned. It's not a must, but it helps to ensure that it has a type name defined (e.g. ProductItemAddedToShoppingCart) and read-only payload data.
Commands
We need to provide a clear business intention to capture a meaningful business event. We can declare it by defining the set of commands to tell what business logic we'll be handling:
import type { Command } from '@event-driven-io/emmett';
import type { PricedProductItem } from './events';

export type AddProductItemToShoppingCart = Command<
  'AddProductItemToShoppingCart',
  {
    shoppingCartId: string;
    productItem: PricedProductItem;
  }
>;

export type RemoveProductItemFromShoppingCart = Command<
  'RemoveProductItemFromShoppingCart',
  {
    shoppingCartId: string;
    productItem: PricedProductItem;
  }
>;

export type ConfirmShoppingCart = Command<
  'ConfirmShoppingCart',
  {
    shoppingCartId: string;
  }
>;

export type CancelShoppingCart = Command<
  'CancelShoppingCart',
  {
    shoppingCartId: string;
  }
>;

export type ShoppingCartCommand =
  | AddProductItemToShoppingCart
  | RemoveProductItemFromShoppingCart
  | ConfirmShoppingCart
  | CancelShoppingCart;
Accordingly, to define the event, we're using the Command type, ensuring that our type definition is aligned. Using the Command type is optional, as Emmett won't force you to use any marker types, but with TypeScript structural typing, this is quite useful to align the type definition.
Business logic and decisions
Knowing what may happen (events) and our business intentions (commands), we can define our business logic.
Let's say that we have the following business rules:
- The customer must provide the quantity when selecting and adding a product to the basket. The system calculates the product price based on the current price list.
- The customer may remove a product with a given price from the cart.
- The customer can confirm the shopping cart and start the order fulfilment process.
- The customer may cancel the shopping cart and reject all selected products.
- After shopping cart confirmation or cancellation, the product can no longer be added or removed from the cart.
To evaluate business rules, it'd be helpful if we had the current state in which we could make our decisions. It could look as follows:
export type EmptyShoppingCart = {
  status: 'Empty';
};

export type OpenedShoppingCart = {
  status: 'Opened';

  productItems: ProductItems;
};

export type ClosedShoppingCart = {
  status: 'Closed';
};

export type ShoppingCart =
  EmptyShoppingCart | OpenedShoppingCart | ClosedShoppingCart;

export type ProductItems = Map<string, number>;
Simple as that. No additional classes are needed. Our shopping cart can be either Empty (initial state), Opened (we added or removed items) or Closed (confirmed or cancelled). Based on the above rules, it's enough to keep product items as a simple map with product id and the record with price and quantity.
Keep your state slimmed down
It's essential to keep our state focused on decision-making. We should trim it to only contain data used in our business rules evaluation. Read more in the article
Now, let's define our business logic! We can do it through a set of functions:
import { EmmettError, IllegalStateError, sum } from '@event-driven-io/emmett';

export const addProductItem = (
  command: AddProductItemToShoppingCart,
  state: ShoppingCart,
): ProductItemAddedToShoppingCart => {
  if (state.status === 'Closed')
    throw new IllegalStateError('Shopping Cart already closed');

  const {
    data: { shoppingCartId, productItem },
    metadata,
  } = command;

  return {
    type: 'ProductItemAddedToShoppingCart',
    data: {
      shoppingCartId,
      productItem,
      addedAt: metadata?.now ?? new Date(),
    },
  };
};

export const removeProductItem = (
  command: RemoveProductItemFromShoppingCart,
  state: ShoppingCart,
): ProductItemRemovedFromShoppingCart => {
  if (state.status !== 'Opened')
    throw new IllegalStateError('Shopping Cart is not opened');

  const {
    data: { shoppingCartId, productItem },
    metadata,
  } = command;

  const currentQuantity = state.productItems.get(productItem.productId) ?? 0;

  if (currentQuantity < productItem.quantity)
    throw new IllegalStateError('Not enough products');

  return {
    type: 'ProductItemRemovedFromShoppingCart',
    data: {
      shoppingCartId,
      productItem,
      removedAt: metadata?.now ?? new Date(),
    },
  };
};

export const confirm = (
  command: ConfirmShoppingCart,
  state: ShoppingCart,
): ShoppingCartConfirmed => {
  if (state.status !== 'Opened')
    throw new IllegalStateError('Shopping Cart is not opened');

  const totalQuantityOfAllProductItems = sum(state.productItems.values());

  if (totalQuantityOfAllProductItems <= 0)
    throw new IllegalStateError('Shopping Cart is empty');

  const {
    data: { shoppingCartId },
    metadata,
  } = command;

  return {
    type: 'ShoppingCartConfirmed',
    data: {
      shoppingCartId,
      confirmedAt: metadata?.now ?? new Date(),
    },
  };
};

export const cancel = (
  command: CancelShoppingCart,
  state: ShoppingCart,
): ShoppingCartCancelled => {
  if (state.status !== 'Opened')
    throw new IllegalStateError('Shopping Cart is not opened');

  const {
    data: { shoppingCartId },
    metadata,
  } = command;

  return {
    type: 'ShoppingCartCancelled',
    data: {
      shoppingCartId,
      canceledAt: metadata?.now ?? new Date(),
    },
  };
};
As you see, this is a simple set of functions with a repeatable pattern. They take command and the state and a make decision. The result of business logic is always an event (or multiple events). If business rules validation fails, you can either throw an error or return a failure result (it can also be another event), but I'll let you decide on your preferences.
We can also wrap the whole processing into a single function:
export const decide = (command: ShoppingCartCommand, state: ShoppingCart) => {
  const { type } = command;

  switch (type) {
    case 'AddProductItemToShoppingCart':
      return addProductItem(command, state);
    case 'RemoveProductItemFromShoppingCart':
      return removeProductItem(command, state);
    case 'ConfirmShoppingCart':
      return confirm(command, state);
    case 'CancelShoppingCart':
      return cancel(command, state);
    default: {
      const _notExistingCommandType: never = type;
      throw new EmmettError(`Unknown command type`);
    }
  }
};
Such repeatable patterns are powerful, as they open easier composition, which is the base of the Emmett way.
Building state from events
We know how to run business logic based on state and command. Yet, in event sourcing, events are the state.
Each event recorded due to the business logic is appended to the event stream. An event stream is an ordered sequence of events. Event stream id equals the entity id (e.g. shopping cart id). To get the current state of events, we need to read all events previously recorded. Then, we take the initial state and apply it one by one to get the current state at the time. Yes, the state we'll use in business logic.
The state aggregation can be coded as:
const currentState = events.reduce<State>(evolve, initialState());For our case initial state can look like:
export const initialState = (): ShoppingCart => {
  return {
    status: 'Empty',
  };
};
Now let's define the evolve function that will evolve our state based on events:
export const evolve = (
  state: ShoppingCart,
  event: ShoppingCartEvent,
): ShoppingCart => {
  const { type, data } = event;

  switch (type) {
    case 'ProductItemAddedToShoppingCart':
    case 'ProductItemRemovedFromShoppingCart': {
      if (state.status !== 'Opened' && state.status !== 'Empty') return state;

      const {
        productItem: { productId, quantity },
      } = data;

      const productItems =
        state.status === 'Opened'
          ? state.productItems
          : new Map<string, number>();

      const plusOrMinus = type == 'ProductItemAddedToShoppingCart' ? 1 : -1;

      return {
        status: 'Opened',
        productItems: withUpdatedQuantity(
          productItems,
          productId,
          plusOrMinus * quantity,
        ),
      };
    }
    case 'ShoppingCartConfirmed':
    case 'ShoppingCartCancelled':
      return { status: 'Closed' };

    default:
      return state;
  }
};

const withUpdatedQuantity = (
  current: ProductItems,
  productId: string,
  quantity: number,
) => {
  const productItems = new Map(current);
  const currentQuantity = productItems.get(productId) ?? 0;

  productItems.set(productId, currentQuantity + quantity);

  return productItems;
};
Read also more in article How to get the current entity state from events? and follow up on Should you throw an exception when rebuilding the state from events?.
Unit Testing
One of the mentioned benefits is testing, which Emmett helps to do out of the box.
For Event Sourcing, the testing pattern looks like this:
- GIVEN set of events recorded for the entity,
- WHEN we run the command on the state built from events,
- THEN we’re getting new event(s) as a result of business logic. Or the exception is thrown.
Tests for our Shopping Cart business logic can look like this:
import { randomUUID } from 'node:crypto';
import type { PricedProductItem } from './events';

import { DeciderSpecification } from '@event-driven-io/emmett';

const given = DeciderSpecification.for({
  decide,
  evolve,
  initialState: initialState,
});

void describe('ShoppingCart', () => {
  void describe('When empty', () => {
    void it('should add product item', () => {
      given([])
        .when({
          type: 'AddProductItemToShoppingCart',
          data: {
            shoppingCartId,
            productItem,
          },
          metadata: { now },
        })
        .then([
          {
            type: 'ProductItemAddedToShoppingCart',
            data: {
              shoppingCartId,
              productItem,
              addedAt: now,
            },
          },
        ]);
    });
  });

  void describe('When opened', () => {
    void it('should confirm', () => {
      given({
        type: 'ProductItemAddedToShoppingCart',
        data: {
          shoppingCartId,
          productItem,
          addedAt: oldTime,
        },
      })
        .when({
          type: 'ConfirmShoppingCart',
          data: {
            shoppingCartId,
          },
          metadata: { now },
        })
        .then([
          {
            type: 'ShoppingCartConfirmed',
            data: {
              shoppingCartId,
              confirmedAt: now,
            },
          },
        ]);
    });
  });

  void describe('When confirmed', () => {
    void it('should not add products', () => {
      given([
        {
          type: 'ProductItemAddedToShoppingCart',
          data: {
            shoppingCartId,
            productItem,
            addedAt: oldTime,
          },
        },
        {
          type: 'ShoppingCartConfirmed',
          data: { shoppingCartId, confirmedAt: oldTime },
        },
      ])
        .when({
          type: 'AddProductItemToShoppingCart',
          data: {
            shoppingCartId,
            productItem,
          },
          metadata: { now },
        })
        .thenThrows(
          (error: Error) => error.message === 'Shopping Cart already closed',
        );
    });
  });

  const getRandomProduct = (): PricedProductItem => {
    return {
      productId: randomUUID(),
      unitPrice: Math.random() * 10,
      quantity: Math.random() * 10,
    };
  };
  const oldTime = new Date();
  const now = new Date();
  const shoppingCartId = randomUUID();

  const productItem = getRandomProduct();
});
Event store
Emmett is an Event Sourcing framework, so we need an event store to store events, aye? Event stores are key-value databases. The key is a record id, and the value is an ordered list of events. Such a sequence of events is called Event Stream. One stream keeps all events recorded for a particular business process or entity.
The essential difference between Event Sourcing and Event Streaming is that in Event Sourcing, events are the state. There's no other state. We use recorded events to get the state and make the next decisions, resulting in more events. Plus, as you'd expect from the database, we get strong consistency on writes and reads. Read more in article.
Emmett provides a lightweight abstraction for event stores. We don't intend to provide the lowest common denominator but streamline the typical usage patterns. It's OK if you use your preferred event store or client for the cases where those parts do not suffice your needs. Still, what's there should take you far enough.
It brings you three most important methods:
readStream- reads events for the specific stream. By default, it reads all events, but through options, you can specify the event range you want to get (from,to,maxCount). You can also specify the expected stream version.appendToStream- appends new events at the end of the stream. All events should be appended as an atomic operation. You can specify the expected stream version for an optimistic concurrency check. We're also getting the next stream version as a result.aggregateStream- builds the current state from events. Internally, event store implementation should read all events in the stream based on the passed initial state and theevolvefunction. It also supports all the same options as thereadStreammethod.
Command Handling
As you saw in the unit tests example, Event Sourcing brings a repeatable pattern for handling business logic. We can expand that to application logic.
Command Handling can be described by the following steps:
- Read events from the stream and build the state from them (in other words aggregate stream). Get also the current version of the stream.
- Run the business logic using the command and the state. Use the default (initial) state if the stream does not exist.
- Append the result of the business logic (so events) at the end of the stream from which you've read events. Use the read version (or the one provided by the user) for an optimistic concurrency check.
In pseudo-code, this could look as follows:
const { state, expectedStreamVersion } = await eventStore.aggregateStream(
  streamName,
  {
    evolve,
    initialState,
  },
);

const events = handle(command, state);

await eventStore.appendToStream(streamName, result, { expectedStreamVersion });
That looks quite simple, but generalising it and making it robust requires some experience. But that's why you have Emmett, the intention is to cut the learning curve for you and help you with basic abstractions.
You can use the CommandHandler method to set up a command handler for you:
import { CommandHandler } from '@event-driven-io/emmett';
import { evolve, initialState } from './shoppingCart';

export const handle = CommandHandler({ evolve, initialState });
Such handlers should be defined per stream type (e.g., one for Shopping Cart, the other for Orders, etc.). It can be used later in the application code as:
import { getInMemoryEventStore } from '@event-driven-io/emmett';

const eventStore = getInMemoryEventStore();

const command: AddProductItemToShoppingCart = {
  type: 'AddProductItemToShoppingCart',
  data: {
    shoppingCartId,
    productItem,
  },
};

const { nextExpectedStreamVersion } = await handle(
  eventStore,
  shoppingCartId,
  (state) => addProductItem(command, state),
);
You could put such code, e.g. in your WebApi endpoint. Let's go to the next step and use that in practice in the real web application.
See the Command Handling guide for writing decisions, controlling concurrency, retries, and wiring the handler to HTTP.
Application Setup
Seems like we have our business rules modelled, business logic reflected in code, and even tested. You also know how to write application code for handling commands. Isn't that cool? That's nice, but we need to build real applications, which nowadays typically mean a Web Application. Let's try to do it as well.
Node.js is a great, lightweight environment that doesn't require much ceremony. Some tools try to bring, but we want to keep it simple in Emmett. What could be simpler than building an Express.js application?
Let's add some flavour to the classical Express.js app by installing the emmett-expressjs package:
$ npm add @event-driven-io/emmett-expressjs$ pnpm add @event-driven-io/emmett-expressjs$ yarn add @event-driven-io/emmett-expressjs$ bun add @event-driven-io/emmett-expressjsWe don't want to replace your favourite frameworks but get synergy with them. We want to help you cut the boilerplate by providing safe defaults to the configuration and simple wrappers. The example?
import { getInMemoryEventStore } from '@event-driven-io/emmett';
import { getApplication, startAPI } from '@event-driven-io/emmett-expressjs';
import type { Application } from 'express';
import type { Server } from 'http';

const eventStore = getInMemoryEventStore();

const shoppingCarts = shoppingCartApi(
  eventStore,
  getUnitPrice,
  () => new Date(),
);

const application: Application = getApplication({
  apis: [shoppingCarts],
});

const server: Server = startAPI(application);
Those are just a few lines, but there are a few things to discuss here. Let's tackle them one by one.
Application setup
Emmett provides the getApplication method that sets up the recommended configuration of the Express.js application. By calling it, you'll get:
JSON and Url Encoding middlewares set up needed for WebApi request processing,
Problem details middleware. Why reinvent the wheel if there's now an industry standard for handling error responses? See RFC 9457 - Problem Details for HTTP APIs) - we're implementing it for you out of the box. We've also set up a basic error-to-status mapping convention. For instance, for Emmett built-in error types:
ValidationErrorto400,IllegalStateErrorto403,NotFoundErrorto404,ConcurrencyErrorto412.
You can also customise that and provide your custom mapping.
Default setup for using ETag headers for optimistic concurrency.
Unified way of setting up WebApis via providing a set of router configurations.
Of course, you can disable all of that or use your current setup. All of that is optional for Emmett to work. We just want to make things easier for you and help you speed up your development using industry standards. We prefer composition over replacement.
Starting Application
The startAPI method encapsulates the default startup options like the default port (in Emmett's case, it's 3000). A separate startAPI method allows you to customise the default application setup and makes it easier to run integration tests, as you'll see in a moment.
Router configuration
To configure API, we need to provide router configuration. We can do it via the apis property of the getApplication options. WebApi setup is a simple function that takes the router and defines needed routings on it.
export type WebApiSetup = (router: Router) => void;We recommend providing different web app configurations for different endpoints' logical groupings. It's also worth injecting all needed dependencies from the top, as that will make integration testing easier.
That's what we did in our case. We've set up our Shopping Carts API and injected external dependencies:
- event store to store and retrieve events,
- The
getUnitPricemethod represents a call to an external service to get the price of a product added to the shopping cart, - We're also passing the current date generator. Embracing this non-deterministic dependency will be helpful for integration testing later on.
That clearly explains what dependencies this API needs, and by reading the file, you can understand what your application technology needs. That should cut the onboarding time for new people grasping our system setup.
import { getInMemoryEventStore } from '@event-driven-io/emmett';

const eventStore = getInMemoryEventStore();

const shoppingCarts = shoppingCartApi(
  eventStore,
  getUnitPrice,
  () => new Date(),
);
We're using the simplest option for this guide: an in-memory event store. For a real application, you'd need to use another, e.g. PostgreSQL implementation.
Sounds like we have all the building blocks to define our API; let's do it!
WebAPI definition
Let's define our Shopping Cart WebApi. As mentioned before, we'll need two external dependencies: event store and query for product price:
import type { WebApiSetup } from '@event-driven-io/emmett-expressjs';
import { Router } from 'express';
import { evolve, initialState } from '../shoppingCart';

// Let's setup the command handler, we'll use it in endpoints
const handle = CommandHandler({ evolve, initialState });

export const shoppingCartApi =
  (
    // external dependencies
    eventStore: EventStore,
    getUnitPrice: (productId: string) => Promise<number>,
  ): WebApiSetup =>
  (router: Router): void => {
    // We'll setup routes here
  };
The API definition is a function taking external dependencies and returning the Web API setup. We're also setting up Command Handler (as explained in the previous section). Let's not keep it empty for too long and define our first endpoint!
We'll start with adding product items to the shopping cart and vanilla Express.js syntax.
import type { Request, Response } from 'express';

type AddProductItemRequest = Request<
  Partial<{ clientId: string; shoppingCartId: string }>,
  unknown,
  Partial<{ productId: string; quantity: number }>
>;

router.post(
  '/clients/:clientId/shopping-carts/current/product-items',
  async (request: AddProductItemRequest, response: Response) => {
    // 1. Translate request params to the command
    const shoppingCartId = getShoppingCartId(
      assertNotEmptyString(request.params.clientId),
    );
    const productId = assertNotEmptyString(request.body.productId);

    const command: AddProductItemToShoppingCart = {
      type: 'AddProductItemToShoppingCart',
      data: {
        shoppingCartId,
        productItem: {
          productId,
          quantity: assertPositiveNumber(request.body.quantity),
          unitPrice: await getUnitPrice(productId),
        },
      },
    };

    // 2. Handle command
    await handle(eventStore, shoppingCartId, (state) =>
      addProductItem(command, state),
    );

    // 3. Send response status
    response.sendStatus(204);
  },
);
Web Api Command Handling can be described by the following steps:
- Translate and request params to the command. This is also a place to run necessary validation. Thanks to that, once we created our command, we can trust that it's validated and semantically correct. We don't need to repeat that in the business logic. That reduces the number of IFs and, eventually, the number of unit tests.
- Run command handler on top of business logic. As you see, we keep things explicit; you can still run Go to definition in your IDE and understand what's being run. So we're keeping things that should be explicit, explicit and hiding boilerplate that can be implicit.
- Return the proper HTTP response.
As you see, it's just a regular Express.js syntax. Still, in the longer term, it's better to have a way to make it a more scalable approach and unify intended usage patterns. That's what we're here for, right?
In Emmett, you can define it also like that:
router.post(
  '/clients/:clientId/shopping-carts/current/product-items',
  on(async (request: AddProductItemRequest) => {
    // 1. Translate request params to the command
    const shoppingCartId = getShoppingCartId(
      assertNotEmptyString(request.params.clientId),
    );
    const productId = assertNotEmptyString(request.body.productId);

    const command: AddProductItemToShoppingCart = {
      type: 'AddProductItemToShoppingCart',
      data: {
        shoppingCartId,
        productItem: {
          productId,
          quantity: assertPositiveNumber(request.body.quantity),
          unitPrice: await getUnitPrice(productId),
        },
      },
    };

    // 2. Handle command
    await handle(eventStore, shoppingCartId, (state) =>
      addProductItem(command, state),
    );

    // 3. Return response status
    return NoContent();
  }),
);
on is a simple wrapper:
export type HttpResponse = (response: Response) => void;

export type HttpHandler<RequestType extends Request> = (
  request: RequestType,
) => Promise<HttpResponse> | HttpResponse;

export const on =
  <RequestType extends Request>(handle: HttpHandler<RequestType>) =>
  async (
    request: RequestType,
    response: Response,
    _next: NextFunction,
  ): Promise<void> => {
    const setResponse = await Promise.resolve(handle(request));

    return setResponse(response);
  };
But this simplicity is powerful as:
- it makes code more explicit on what we have as input and what is output. Emmett also defines the explicit signatures for the most common
- unifies request processing, which should enable better handling of telemetry, logging, OpenApi, etc.
- enables keeping endpoint handlers even in different files, so enables organisation,
- you could even unit test it without running the whole application.
If you still don't buy that, check a more advanced scenario showing a different flow, where shopping cart opening should happen explicitly:
router.post(
  '/clients/:clientId/shopping-carts/',
  on(async (request: Request) => {
    const clientId = assertNotEmptyString(request.params.clientId);
    const shoppingCartId = clientId;

    const result = await handle(
      eventStore,
      shoppingCartId,
      {
        type: 'OpenShoppingCart',
        data: { clientId, shoppingCartId, now: new Date() },
      },
      { expectedStreamVersion: STREAM_DOES_NOT_EXIST },
    );

    return Created({
      createdId: shoppingCartId,
      eTag: toWeakETag(result.nextExpectedStreamVersion),
    });
  }),
);
Yes, Emmett provides more built-in response helpers together with the explicit options. Created will generate the location header. If you're returning the error status (e.g. 404 Not Found), you can add problem details, information, etc.
What's also sweet is that you can use Emmett's Express.js helpers even without an Event Sourcing code; Bon Appétit!
Still, we're here for the Event Sourcing, so let's see the whole API:
// Add Product Item
router.post(
  '/clients/:clientId/shopping-carts/current/product-items',
  on(async (request: AddProductItemRequest) => {
    const shoppingCartId = getShoppingCartId(
      assertNotEmptyString(request.params.clientId),
    );
    const productId = assertNotEmptyString(request.body.productId);

    const command: AddProductItemToShoppingCart = {
      type: 'AddProductItemToShoppingCart',
      data: {
        shoppingCartId,
        productItem: {
          productId,
          quantity: assertPositiveNumber(request.body.quantity),
          unitPrice: await getUnitPrice(productId),
        },
      },
      metadata: { now: getCurrentTime() },
    };

    await handle(eventStore, shoppingCartId, (state) =>
      addProductItem(command, state),
    );

    return NoContent();
  }),
);

// Remove Product Item
router.delete(
  '/clients/:clientId/shopping-carts/current/product-items',
  on(async (request: Request) => {
    const shoppingCartId = getShoppingCartId(
      assertNotEmptyString(request.params.clientId),
    );

    const command: RemoveProductItemFromShoppingCart = {
      type: 'RemoveProductItemFromShoppingCart',
      data: {
        shoppingCartId,
        productItem: {
          productId: assertNotEmptyString(request.query.productId),
          quantity: assertPositiveNumber(Number(request.query.quantity)),
          unitPrice: assertPositiveNumber(Number(request.query.unitPrice)),
        },
      },
      metadata: { now: getCurrentTime() },
    };

    await handle(eventStore, shoppingCartId, (state) =>
      removeProductItem(command, state),
    );

    return NoContent();
  }),
);

// Confirm Shopping Cart
router.post(
  '/clients/:clientId/shopping-carts/current/confirm',
  on(async (request: Request) => {
    const shoppingCartId = getShoppingCartId(
      assertNotEmptyString(request.params.clientId),
    );

    const command: ConfirmShoppingCart = {
      type: 'ConfirmShoppingCart',
      data: { shoppingCartId },
      metadata: { now: getCurrentTime() },
    };

    await handle(eventStore, shoppingCartId, (state) =>
      confirm(command, state),
    );

    return NoContent();
  }),
);

// Cancel Shopping Cart
router.delete(
  '/clients/:clientId/shopping-carts/current',
  on(async (request: Request) => {
    const shoppingCartId = getShoppingCartId(
      assertNotEmptyString(request.params.clientId),
    );

    const command: CancelShoppingCart = {
      type: 'CancelShoppingCart',
      data: { shoppingCartId },
      metadata: { now: getCurrentTime() },
    };

    await handle(eventStore, shoppingCartId, (state) =>
      cancel(command, state),
    );

    return NoContent();
  }),
);
Of course, we could make it even crisper and automagically do the request mapping, more conventional-based status resolution, decorators, and fire-command-and-forget, but we won't. Why?
Emmett prefers composability over magical glue. We believe that a healthy amount of copy-paste won't harm you. We target removability and segregation of the code and making things explicit that should be explicit.
Still, Emmett won't tell you how to live! If you want to add more, feel free to do it. We want to give you basic building blocks and recommendations so you can build on top of that!
Integration Testing
Cool, we now have API up and running. We even tested our domain logic with unit tests. That's great, but as you know, a lot can happen in the meantime. The request mapping or validation may fail; middlewares (like auth one) can say no. It'd be great to test it.
There are many different shapes of Testing: Pyramids, Honeycombs, Thropies etc. All of them share the goal of having them reliable and fast. However, agreeing on where the compromise is and where to put the biggest effort is, of course, challenging to agree.
No matter what your preference is, Emmett has got you covered.
Let's say that you're a fan of Hexagonal/Ports & Adapters Architecture and you'd like to test the whole flow being able to replace dependencies (adapters) with in-memory implementations to have your tests running in-memory. Such approaches have tradeoffs. The pros are that they run smoothly, allow a fast feedback loop, and run tests continuously. The downside is that they don't validate all integration scenarios with real tools. Don't worry, we'll cover that later!
I heard that one picture could speak more than a thousand words, so let's look at this one:
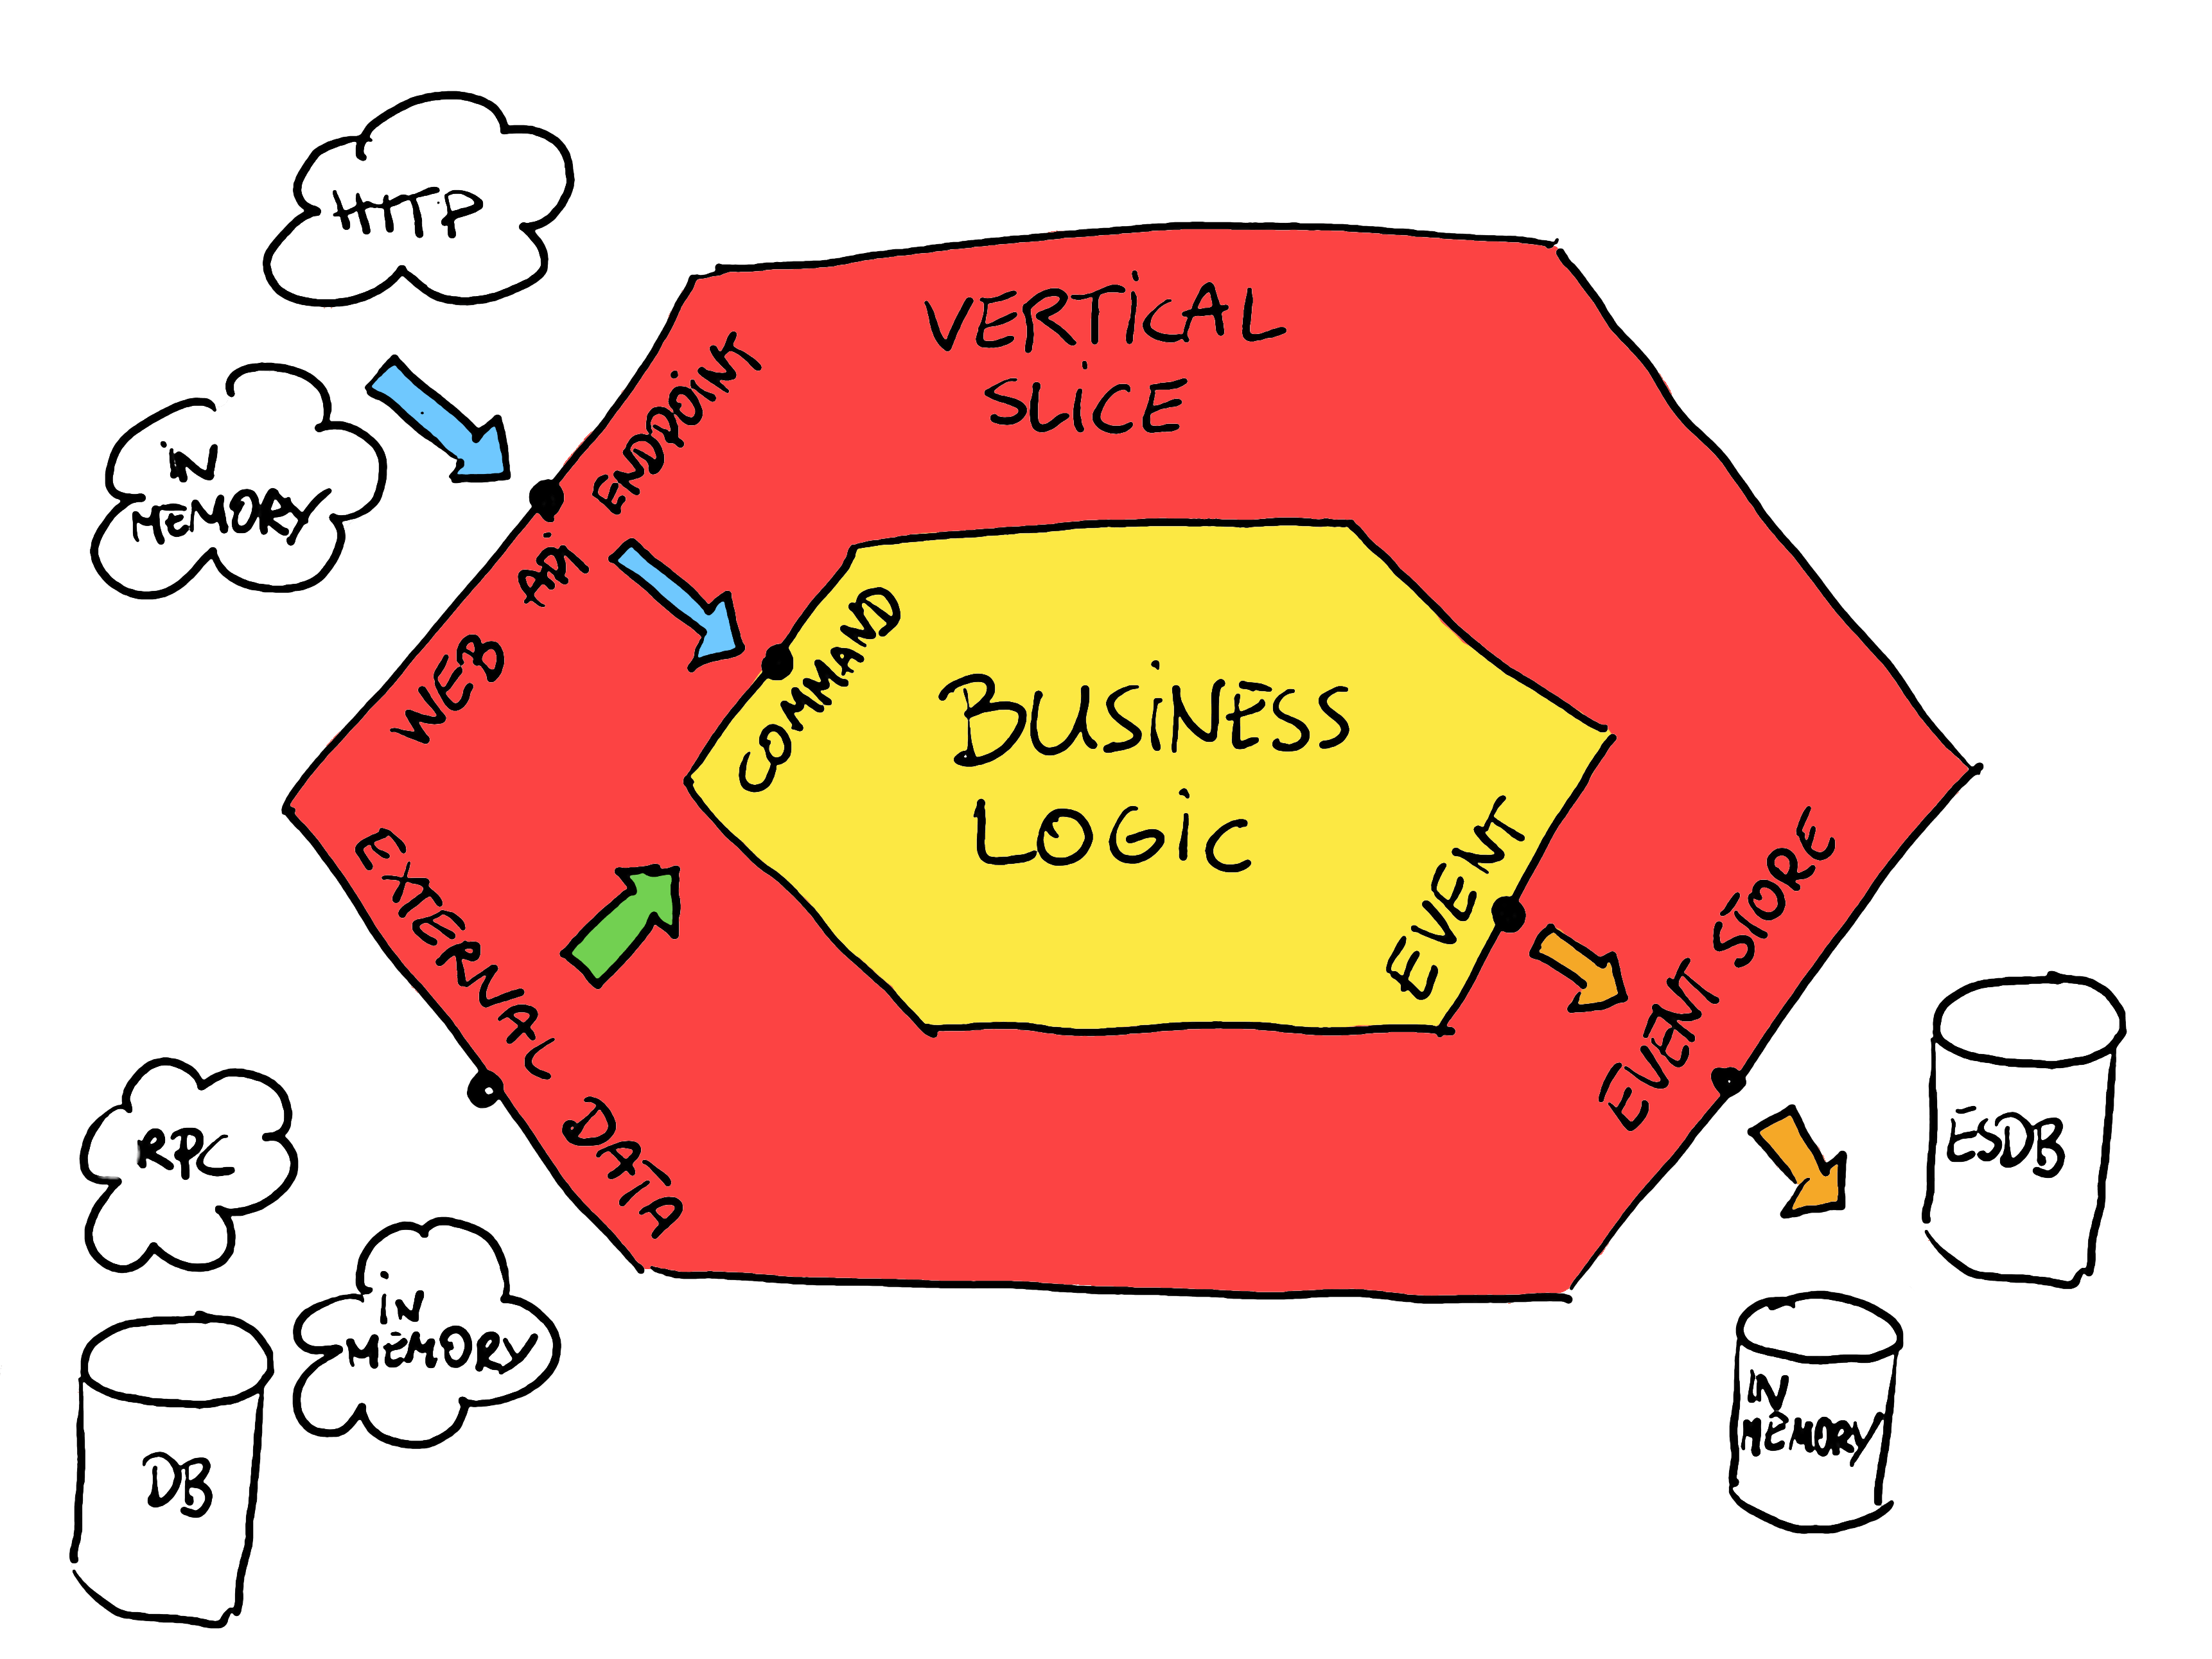
The picture shows the boundaries between the business logic and our application layer.
Our application layer is thin; it's a vertical slice to which the entry point (port) is the WebApi endpoint. Inside it, we can do additional stuff like getting product prices and mapping requests with additional data added to the command. We handle commands in the business logic that return event(s). We're storing them in the event store. This looks like that in the already known adding product to shopping cart code:
const handle = CommandHandler({ evolve, initialState });

type AddProductItemRequest = Request<
  Partial<{ clientId: string; shoppingCartId: string }>,
  unknown,
  Partial<{ productId: string; quantity: number }>
>;

////////////////////////////////////////////////////
// Web Api
////////////////////////////////////////////////////

export const shoppingCartApi =
  (
    // external dependencies
    eventStore: EventStore,
    getUnitPrice: (productId: string) => Promise<number>,
  ): WebApiSetup =>
  (router: Router): void => {
    ////////////////////////////////////////////////////
    // Endpoint
    ////////////////////////////////////////////////////
    router.post(
      '/clients/:clientId/shopping-carts/current/product-items',
      on(async (request: AddProductItemRequest) => {
        const shoppingCartId = getShoppingCartId(
          assertNotEmptyString(request.params.clientId),
        );
        const productId = assertNotEmptyString(request.body.productId);

        const command: AddProductItemToShoppingCart = {
          type: 'AddProductItemToShoppingCart',
          data: {
            shoppingCartId,
            productItem: {
              productId,
              quantity: assertPositiveNumber(request.body.quantity),
              unitPrice: await getUnitPrice(productId),
            },
          },
        };

        await handle(eventStore, shoppingCartId, (state) =>
          addProductItem(command, state),
        );

        return NoContent();
      }),
    );
    // (...) other endpoints
  };

////////////////////////////////////////////////////
// Business Logic
////////////////////////////////////////////////////

export type AddProductItemToShoppingCart = Command<
  'AddProductItemToShoppingCart',
  {
    shoppingCartId: string;
    productItem: PricedProductItem;
  }
>;

export const addProductItem = (
  command: AddProductItemToShoppingCart,
  state: ShoppingCart,
): ProductItemAddedToShoppingCart => {
  if (state.status === 'Closed')
    throw new IllegalStateError('Shopping Cart already closed');

  const {
    data: { shoppingCartId, productItem },
    metadata,
  } = command;

  return {
    type: 'ProductItemAddedToShoppingCart',
    data: {
      shoppingCartId,
      productItem,
      addedAt: metadata?.now ?? new Date(),
    },
  };
};
Our slice has 3 ports that one can plug in:
- WebApi endpoint, where the user can send a request (which will be translated to a command).
getUnitPricefunction that gets the product price. Depending on our design, it may represent a call to an external service (e.g. with HTTP), calling a database (e.g. read model) or just running some computation. We're also using it as an input to the command.- Event store, from which we load events and store new facts.
We already made those dependencies explicit, allowing us to replace the real ones in the tests. Also, as we know that we're doing Event Sourcing then, why not take advantage of that and write our tests in the following style:
TIP
- GIVEN set of events recorded for the entity,
- WHEN we run the web API request,
- THEN we’re getting new event(s) as a result of business logic. Or the error status is returned with Problem Details.
Let's start with defining our WebApi specification. We're using ApiSpecification class from @event-driven-io/emmett-expressjs.
import { getInMemoryEventStore } from '@event-driven-io/emmett';
import {
  ApiSpecification,
  getApplication,
} from '@event-driven-io/emmett-expressjs';

const unitPrice = 100;
const now = new Date();

const given = ApiSpecification.for<ShoppingCartEvent>(
  () => getInMemoryEventStore(),
  (eventStore) =>
    getApplication({
      apis: [
        shoppingCartApi(
          eventStore,
          () => Promise.resolve(unitPrice),
          () => now,
        ),
      ],
    }),
);
We're also using the same getApplication known from the previous steps. The only difference is that we replaced real dependencies with the in-memory ones. ApiSpecification uses internally SuperTest package. It allows straightforward testing of Express.js, e.g. it ensures that server starts in a random port and provides the helpers for building test requests, which we'll use in our tests.
Having it, we can define our tests as:
import {
  existingStream,
  expectNewEvents,
  expectResponse,
} from '@event-driven-io/emmett-expressjs';

void describe('When opened with product item', () => {
  void it('should confirm', () => {
    return given(
      existingStream(shoppingCartId, [
        {
          type: 'ProductItemAddedToShoppingCart',
          data: {
            shoppingCartId,
            productItem,
            addedAt: oldTime,
          },
        },
      ]),
    )
      .when((request) =>
        request.post(`/clients/${clientId}/shopping-carts/current/confirm`),
      )
      .then([
        expectResponse(204),
        expectNewEvents(shoppingCartId, [
          {
            type: 'ShoppingCartConfirmed',
            data: {
              shoppingCartId,
              confirmedAt: now,
            },
          },
        ]),
      ]);
  });
});
The test follows the similar Given/When/Then pattern as our unit tests but uses HTTP request to trigger the command handling and uses additional helpers to set up and verify data:
exisitingStream- allows you to specify the stream id and events existing in the stream. You can set more than one stream if your command handling logic requires that,expectResponse- verifies the HTTP response with expected criteria like status code. You can also check the response body, headers, etc. For expected errors you can useexpectErroraccordingly.expectEvents- ensures that new events are appended to the specific streams in the event store.
Complete tests will look like this:
import { getInMemoryEventStore } from '@event-driven-io/emmett';
import {
  ApiSpecification,
  existingStream,
  expectError,
  expectNewEvents,
  expectResponse,
  getApplication,
} from '@event-driven-io/emmett-expressjs';
import { randomUUID } from 'node:crypto';

void describe('ShoppingCart', () => {
  let clientId: string;
  let shoppingCartId: string;

  beforeEach(() => {
    clientId = randomUUID();
    shoppingCartId = `shopping_cart:${clientId}:current`;
  });

  void describe('When empty', () => {
    void it('should add product item', () => {
      return given()
        .when((request) =>
          request
            .post(`/clients/${clientId}/shopping-carts/current/product-items`)
            .send(productItem),
        )
        .then([
          expectNewEvents(shoppingCartId, [
            {
              type: 'ProductItemAddedToShoppingCart',
              data: {
                shoppingCartId,
                productItem,
                addedAt: now,
              },
            },
          ]),
        ]);
    });
  });

  void describe('When opened with product item', () => {
    void it('should confirm', () => {
      return given(
        existingStream(shoppingCartId, [
          {
            type: 'ProductItemAddedToShoppingCart',
            data: {
              shoppingCartId,
              productItem,
              addedAt: oldTime,
            },
          },
        ]),
      )
        .when((request) =>
          request.post(`/clients/${clientId}/shopping-carts/current/confirm`),
        )
        .then([
          expectResponse(204),
          expectNewEvents(shoppingCartId, [
            {
              type: 'ShoppingCartConfirmed',
              data: {
                shoppingCartId,
                confirmedAt: now,
              },
            },
          ]),
        ]);
    });
  });

  void describe('When confirmed', () => {
    void it('should not add products', () => {
      return given(
        existingStream(shoppingCartId, [
          {
            type: 'ProductItemAddedToShoppingCart',
            data: {
              shoppingCartId,
              productItem,
              addedAt: oldTime,
            },
          },
          {
            type: 'ShoppingCartConfirmed',
            data: { shoppingCartId, confirmedAt: oldTime },
          },
        ]),
      )
        .when((request) =>
          request
            .post(`/clients/${clientId}/shopping-carts/current/product-items`)
            .send(productItem),
        )
        .then(
          expectError(403, {
            detail: 'Shopping Cart already closed',
            status: 403,
            title: 'Forbidden',
            type: 'about:blank',
          }),
        );
    });
  });

  const oldTime = new Date();
  const now = new Date();
  const unitPrice = Math.random() * 10;

  const given = ApiSpecification.for<ShoppingCartEvent>(
    () => getInMemoryEventStore(),
    (eventStore) =>
      getApplication({
        apis: [
          shoppingCartApi(
            eventStore,
            () => Promise.resolve(unitPrice),
            () => now,
          ),
        ],
      }),
  );

  const getRandomProduct = (): PricedProductItem => {
    return {
      productId: randomUUID(),
      unitPrice,
      quantity: Math.random() * 10,
    };
  };

  const productItem = getRandomProduct();
});
You can use those tests as complementary to the business logic (e.g., testing the most important scenarios), or you may even replace unit tests with them. As they're in memory, they're fast enough to be run continuously.
You can also replace the in-memory store with the real one (e.g. PostgreSQL) and test your module in isolation from other modules. The choice is yours!
Again, in Emmett, we don't want to force you to anything but give you options and the recommended safe path.
TIP
We encourage you to watch Martin Thwaites' talk "Building Operable Software with TDD (but not the way you think)". It nicely explains why we can now shift the balance from unit testing to integration testing.
Making it real
See, we now have a fully working and tested web application. We can send requests, handle business logic, cool! Yet, we're missing a few steps to make it production-ready. Using an in-memory implementation is fine for prototyping, but you wouldn't want your data to disappear when the application restarts, would you?
Let's start by adding more flavour and finally use a real database! Which one? The common answer nowadays is: "Just use PostgreSQL!", and that's what we're going to do!
We need to start by installing Emmett's PostgreSQL package:
$ npm add @event-driven-io/emmett-postgresql$ pnpm add @event-driven-io/emmett-postgresql$ yarn add @event-driven-io/emmett-postgresql$ bun add @event-driven-io/emmett-postgresqlNow, we need to switch the in-memory implementation to PostgreSQL in the WebApi setup. Updated will look as follows:
import { getPostgreSQLEventStore } from '@event-driven-io/emmett-postgresql';

const connectionString =
  process.env.POSTGRESQL_CONNECTION_STRING ??
  'postgresql://localhost:5432/postgres';

const eventStore = getPostgreSQLEventStore(connectionString);

const shoppingCarts = shoppingCartApi(
  eventStore,
  getUnitPrice,
  () => new Date(),
);
It's as simple as that; we're injecting just a different implementation.
Emmett provides you with out-of-the-box support for the following storage:
- PostgreSQL with emmett-postgresql package,
- EventStoreDB with emmett-esdb package,
- MongoDB with emmett-mongodb package,
- SQLite with emmett-sqlite package,
- In-Memory with regular emmett package.
We encourage you to select the one that you prefer; the setup will be similar. You simply need to install a specific package and set up a chosen event store accordingly.
Read more about how event stores are built in the article.
We're also missing one more essential aspect...
Read Models
In Event Sourcing, we rebuild state by reading all events in a stream. That's fast for one shopping cart - maybe 10-50 events. But showing a list of all shopping carts? If we tried to build it in memory, as we did for business logic, on the flight, we'd need to read events from potentially thousands of streams. Then rebuild each cart's state in memory, and filter them. Every page load would process hundreds of thousands of events.
In our systems, most operations are queries. We need them to be performant and efficient. To do that, we need to materialise our data into read models.
In Event Sourcing, that means applying our events and storing the result in database tables. Then we can filter, sort, and search efficiently. Projections are event handlers that update these tables when events happen.
Single Stream Projections with Pongo
We could store our read models in PostgreSQL tables. Create columns for each field. Write UPDATE statements. Handle migrations when fields change. Map document structures to relational schemas.
That's why we have Pongo. It stores documents as JSONB in PostgreSQL - structured data that PostgreSQL can index and query, not just text blobs. You can use powerful MongoDB-like query syntax.
If you followed the PostgreSQL setup earlier, you already have Pongo installed (it comes as a peer dependency with @event-driven-io/emmett-postgresql).
Let's say that we want to show the summary of the shopping cart, showing just the total items count and amount. This could be used, e.g., in the top menu bar, to give users quick feedback. It could be defined as:
type ShoppingCartSummary = {
  _id?: string;
  productItemsCount: number;
  totalAmount: number;
};
Now, let's define how we'd like to apply those events. The evolve function takes the current document state and an event, then returns the updated state:
const evolve = (
  document: ShoppingCartSummary | null,
  {
    type,
    data: event,
  }: ProductItemAdded | ProductItemRemoved | DiscountApplied,
): ShoppingCartSummary => {
  document = document ?? { totalAmount: 0, productItemsCount: 0 };

  switch (type) {
    case 'ProductItemAdded':
      return withAdjustedTotals({
        document,
        productItem: event.productItem,
        by: 'adding',
      });
    case 'ProductItemRemoved':
      return withAdjustedTotals({
        document,
        productItem: event.productItem,
        by: 'removing',
      });
    case 'DiscountApplied':
      return {
        ...document,
        totalAmount: (document.totalAmount * (100 - event.percent)) / 100,
      };
  }
};

const withAdjustedTotals = (options: {
  document: ShoppingCartSummary;
  productItem: PricedProductItem;
  by: 'adding' | 'removing';
}) => {
  const { document, productItem, by } = options;
  const plusOrMinus = by === 'adding' ? 1 : -1;

  return {
    ...document,
    totalAmount:
      document.totalAmount +
      productItem.unitPrice * productItem.quantity * plusOrMinus,
    productItemsCount:
      document.productItemsCount + productItem.quantity * plusOrMinus,
  };
};
As you see, the transformation may not need to handle all event types. We don't need to know the status (whether it's confirmed or not); we just need information about totals.
The next step is to define our Pongo projection. We do it by:
import { pongoSingleStreamProjection } from '@event-driven-io/emmett-postgresql';

const collectionName = 'shopping_carts_summary';

const shoppingCartSummaryProjection = pongoSingleStreamProjection({
  canHandle: ['ProductItemAdded', 'ProductItemRemoved', 'DiscountApplied'],
  collectionName,
  evolve,
});
By that we're handling the specified range of events, applying it using the evolve function and storing the result in the specified Pongo collection. Pongo collections are PostgreSQL tables with a JSONB column for your document data.
Notice something? We didn't touch our business logic. We're interpreting events that already happened. Tomorrow, you might need a different view of the same data - just create a new projection.
If you don't like getting a null document in the evolve function, then you can also provide the initial state:
const shoppingCartSummaryProjection = pongoSingleStreamProjection({
  canHandle: ['ProductItemAdded', 'ProductItemRemoved', 'DiscountApplied'],
  collectionName,
  evolve,
  initialState: () => ({ totalAmount: 0, productItemsCount: 0 }),
});
Then your evolve can skip the setup step and look as follows:
const evolve = (
  document: ShoppingCartSummary,
  {
    type,
    data: event,
  }: ProductItemAdded | ProductItemRemoved | DiscountApplied,
): ShoppingCartSummary => {
  switch (type) {
    case 'ProductItemAdded':
      return withAdjustedTotals({
        document,
        productItem: event.productItem,
        by: 'adding',
      });
    case 'ProductItemRemoved':
      return withAdjustedTotals({
        document,
        productItem: event.productItem,
        by: 'removing',
      });
    case 'DiscountApplied':
      return {
        ...document,
        totalAmount: (document.totalAmount * (100 - event.percent)) / 100,
      };
  }
};
Emmett will provide the initial state if the document with id equal to the stream name doesn't exist.
We need to complete registration by passing it to event store options:
const eventStore = getPostgreSQLEventStore(connectionString, {
  projections: projections.inline([shoppingCartSummaryProjection]), // 👈
});
Inline registration means that projections run in the same database transaction as appending events. Either both succeed or both fail. No inconsistency between your events and read models. Of course, you need to be careful with them, as they can slow your appends, but they're really useful. Async projections are also available; we'll document them soon.
Sounds cool; now we can append a few events through regular event store append events api and query results using Pongo:
import { pongoClient } from '@event-driven-io/pongo';

const connectionString =
  process.env.POSTGRESQL_CONNECTION_STRING ??
  'postgresql://localhost:5432/postgres';

const pongo = pongoClient(connectionString);

const shoppingCartsSummary = pongo.db().collection('shopping_carts_summary');

const summary = await shoppingCartsSummary.findOne({
  _id: 'shopping_cart-123',
});
That's single-stream projection - one stream to one document.
Multi-Stream Projections
So far, each shopping cart had its own stream of events, and we created one summary document per cart. The document ID matched the stream ID. Simple.
But businesses need customer-level analytics. Total spent across all their carts. Number of abandoned versus confirmed carts. Average cart value. This data comes from multiple shopping cart streams, not just one.
What if we'd like to have the read model that aggregates the general summary of client's pending, confirmed and cancelled shopping carts? It could be defined as:
export type ClientShoppingSummary = {
  clientId: string;
  pending: PendingSummary | undefined;
  confirmed: ConfirmedSummary;
  cancelled: CancelledSummary;
};

export type ShoppingSummary = {
  productItemsCount: number;
  totalAmount: number;
};

export type PendingSummary = ShoppingSummary & {
  cartId: string;
};

export type ConfirmedSummary = ShoppingSummary & {
  cartsCount: number;
};

export type CancelledSummary = ShoppingSummary & {
  cartsCount: number;
};
It contains the pending shopping cart information (if there's such a thing) plus the total number of confirmed and cancelled shopping carts, their total amounts, and total product item counts.
The id of our read model is equal to the client id. Every client will have a single summary.
To build this read model, we need to correlate events with respective records. We'll be applying events sequentially. We need to know which record they need to update. If our read model id is equal to the client id, then best if we have the client id in events. But besides the Product Item Added event, we don't.
Of course, we could reconsider adding it to all the events, but we already discussed that we would not necessarily like to. So what should we do?
We could query some other read model (e.g. shopping cart details) and load the client id, but then we'd have an even worse problem. Tying those two models together and decreasing scaling and isolation.
Still, if we think that business-wise, data should always be there, then we could use event metadata. Events have two parts: data (the business facts) and metadata (context like who, when, where). Metadata is typically used for infrastructure concerns - correlation IDs, timestamps, user IDs. But if needed, projections can read it too. That's always a steep hill, and you better be careful not to make metadata a "bag for random data." This definitely can be a hidden trap. There are no hard rules here, but some good heuristics.
We can look at our endpoints and commands that initiate business logic, resulting in events. For instance, if we look at:
POST /clients/:clientId/shopping-carts/current/product-items

DELETE /clients/:clientId/shopping-carts/current/product-items

POST /clients/:clientId/shopping-carts/current/confirm

DELETE /clients/:clientId/shopping-carts/current

GET /clients/:clientId/shopping-carts/current
Then, we see that all of them are in the current shopping cart context and the specific client. That can lead to the conclusion that we already have this client context in our requests. Maybe it's used for authorisation, maybe for tenancy reasons.
If that's not visible in endpoints, we can check on our authorisation rules and middleware. They typically need some data based on the currently authenticated user.
Having that, we could consider making the client id a part of the shopping cart event metadata. As we now have the client ID in metadata, we could use it for the event to read model correlation. For instance:
const clientShoppingSummaryCollectionName = 'ClientShoppingSummary';

export const clientShoppingSummaryProjection = pongoMultiStreamProjection({
  collectionName: clientShoppingSummaryCollectionName,
  // 👇 See what we did here
  getDocumentId: (event) => event.metadata.clientId,
  evolve,
  canHandle: [
    'ProductItemAddedToShoppingCart',
    'ProductItemRemovedFromShoppingCart',
    'ShoppingCartConfirmed',
    'ShoppingCartCancelled',
  ],
});
We're saying that to find the document ID for each shopping cart event, you can use event.metadata.clientId.
Then, the projection definition can look as follows:
const evolve = (
  document: ClientShoppingSummary | null,
  { type, data: event, metadata }: ShoppingCartEvent,
): ClientShoppingSummary | null => {
  const summary: ClientShoppingSummary = document ?? {
    clientId: metadata!.clientId,
    pending: undefined,
    confirmed: initialSummary,
    cancelled: initialSummary,
  };

  switch (type) {
    case 'ProductItemAddedToShoppingCart':
      return {
        ...summary,
        pending: {
          cartId: event.shoppingCartId,
          ...withAdjustedTotals({
            summary: summary.pending,
            with: event.productItem,
            by: 'adding',
          }),
        },
      };
    case 'ProductItemRemovedFromShoppingCart':
      return {
        ...summary,
        pending: {
          cartId: event.shoppingCartId,
          ...withAdjustedTotals({
            summary: summary.pending,
            with: event.productItem,
            by: 'removing',
          }),
        },
      };
    case 'ShoppingCartConfirmed':
      return {
        ...summary,
        pending: undefined,
        confirmed: {
          cartsCount: summary.confirmed.cartsCount + 1,
          ...withAdjustedTotals({
            summary: summary.confirmed,
            with: summary.pending!,
            by: 'adding',
          }),
        },
      };
    case 'ShoppingCartCancelled':
      return {
        ...summary,
        pending: undefined,
        cancelled: {
          cartsCount: summary.confirmed.cartsCount + 1,
          ...withAdjustedTotals({
            summary: summary.confirmed,
            with: summary.pending!,
            by: 'adding',
          }),
        },
      };
    default:
      return summary;
  }
};

const initialSummary = {
  cartsCount: 0,
  productItemsCount: 0,
  totalAmount: 0,
};

const withAdjustedTotals = (options: {
  summary: ShoppingSummary | undefined;
  with: PricedProductItem | ShoppingSummary;
  by: 'adding' | 'removing';
}) => {
  const { summary: document, by } = options;

  const totalAmount =
    'totalAmount' in options.with
      ? options.with.totalAmount
      : options.with.unitPrice * options.with.quantity;
  const productItemsCount =
    'productItemsCount' in options.with
      ? options.with.productItemsCount
      : options.with.quantity;

  const plusOrMinus = by === 'adding' ? 1 : -1;

  return {
    ...document,
    totalAmount: (document?.totalAmount ?? 0) + totalAmount * plusOrMinus,
    productItemsCount:
      (document?.productItemsCount ?? 0) + productItemsCount * plusOrMinus,
  };
};
We also need to register our projection registration in event store options:
const eventStore = getPostgreSQLEventStore(connectionString, {
  projections: projections.inline([
    shoppingCartSummaryProjection,
    clientShoppingSummaryProjection, // 👈
  ]),
});
When to Use Which?
Single-stream projections work when your read model represents one entity. Shopping cart summary. Order details. User profile. The document ID is the stream ID.
Multi-stream projections combine events from different streams into a single document. Customer analytics from all their orders. Product statistics from all carts. System-wide dashboards. You tell the projection how to find the right document for each event.
Think about your queries. If you're showing one cart, use single-stream. If you're showing customer behavior, use multi-stream.
Testing projections
Projection tests should be tested against the real database. Both querying and update capabilities and serialisation can play tricks, so it is better to be certain that it really works. Tests that don't give us such assurance are useless. And we don't want them to be such.
As PostgreSQL is a real database, we need to set it up for our tests. The simplest option is to use a Docker container. You can do it in multiple ways, but the fastest can be using TestContainers. The library allows us to easily set up containers for our tests. It automatically randomise ports, helps in teardown etc.
For PostgreSQL you'll need to install:
$ npm add @testcontainers/postgresql$ pnpm add @testcontainers/postgresql$ yarn add @testcontainers/postgresql$ bun add @testcontainers/postgresqlEventStoreDB testing
Emmett provides the package with additional test containers like the one for EventStoreDB. If you're using EventStoreDB, install emmett-testcontainers and get the test container for it.
Now, let's start with the setup:
import { PostgreSQLProjectionSpec } from '@event-driven-io/emmett-postgresql';
import {
  PostgreSqlContainer,
  StartedPostgreSqlContainer,
} from '@testcontainers/postgresql';
import { after, before, beforeEach, describe, it } from 'vitest';
import { v4 as uuid } from 'uuid';

void describe('Shopping carts summary', () => {
  let postgres: StartedPostgreSqlContainer;
  let connectionString: string;
  let given: PostgreSQLProjectionSpec<
    ProductItemAdded | ProductItemRemoved | DiscountApplied
  >;
  let shoppingCartId: string;

  before(async () => {
    postgres = await new PostgreSqlContainer().start();
    connectionString = postgres.getConnectionUri();

    given = PostgreSQLProjectionSpec.for({
      projection: shoppingCartShortInfoProjection,
      connectionString,
    });
  });

  beforeEach(() => (shoppingCartId = `shoppingCart-${uuid()}`));
});
We're setting up the PostgreSQL test container and projection specification. We'll use it to run our tests. The first one could look as follows:
import { expectPongoDocuments } from '@event-driven-io/emmett-postgresql';

void describe('Shopping carts summary', () => {
  // (...) test setup

  void it('first added product creates document', () =>
    given([])
      .when([
        {
          type: 'ProductItemAddedToShoppingCart',
          data: {
            productItem: { unitPrice: 100, productId: 'shoes', quantity: 100 },
          },
          metadata: {
            streamName: shoppingCartId,
          },
        },
      ])
      .then(
        expectPongoDocuments
          .fromCollection<ShoppingCartSummary>('shopping_carts_summary')
          .withId(shoppingCartId)
          .toBeEqual({
            productItemsCount: 100,
            totalAmount: 10000,
            appliedDiscounts: [],
          }),
      ));
});
We're again using theBehaviour-Driven Design style:
- Given existing stream of events,
- When new events are added,
- Then read model is updated.
We do it this way, as we expect read models to be ONLY updated through upcoming events.
Emmett gives you also out-of-the-box test assertion helpers to make testing Pongo easier.
You may have noticed that our Given is empty, so let's fix it!
import {
  eventsInStream,
  newEventsInStream,
} from '@event-driven-io/emmett-postgresql';

void describe('Shopping carts summary', () => {
  // (...) test setup

  void it('applies discount for existing shopping cart with product', () => {
    const couponId = uuid();

    return given(
      eventsInStream(shoppingCartId, [
        {
          type: 'ProductItemAddedToShoppingCart',
          data: {
            productItem: { unitPrice: 100, productId: 'shoes', quantity: 100 },
          },
        },
      ]),
    )
      .when(
        newEventsInStream(shoppingCartId, [
          {
            type: 'DiscountApplied',
            data: { percent: 10, couponId },
          },
        ]),
      )
      .then(
        expectPongoDocuments
          .fromCollection<ShoppingCartShortInfo>(
            shoppingCartShortInfoCollectionName,
          )
          .withId(shoppingCartId)
          .toBeEqual({
            productItemsCount: 100,
            totalAmount: 9000,
          }),
      );
  });
});
You probably noticed the next helpers: eventsInStream and newEventsInStream. They're responsible for shortening the setup. Depending on your preferences, you can use the raw events setup, including manual metadata assignment, or a more explicit intention helper. My preference would be to use the helper, but it's up to you to decide!
Deleting documents
Can read model data be only updated? Not only that, you can also delete it. Let's imagine that the confirming cart should clear its read model, as we expect a new, empty shopping cart to be created when the new buying process starts.
To have that, we need to update our evolve function by adding ShopingCartConfirmed event:
const evolve = (
  document: ShoppingCartSummary,
  { type, data: event }: ShoppingCartEvent,
): ShoppingCartSummary | null => {
  // <= see here
  switch (type) {
    case 'ProductItemAdded':
      return withAdjustedTotals({
        document,
        productItem: event.productItem,
        by: 'adding',
      });
    case 'ProductItemRemoved':
      return withAdjustedTotals({
        document,
        productItem: event.productItem,
        by: 'removing',
      });
    case 'DiscountApplied':
      return {
        ...document,
        totalAmount: (document.totalAmount * (100 - event.percent)) / 100,
      };

    case 'ShoppingCartConfirmed':
      return null; // <= and here
  }
};
We made the shopping cart confirmed event return null. In Pongo, returning null means "delete this document." Emmett is using the Pongo's handle method internally:
const collection = pongo.db().collection<Document>(collectionName);

for (const event of events) {
  await collection.handle(getDocumentId(event), async (document) => {
    return await evolve(document, event);
  });
}
Pongo's handle method loads the document if it exists, runs your function, then:
- If you return a document, it inserts or updates
- If you return null, it deletes
- All in one atomic operation
It's a bit sneaky, but pretty useful, isn't it?
This flexibility is Event Sourcing at work. Events stay immutable. Projections interpret them however they need. Changed your mind about when to delete documents? Update the projection and rebuild from events.
The test checking will look as follows:
void describe('Shopping carts summary', () => {
  let given: PostgreSQLProjectionSpec<ShoppingCartEvent>;
  // (...) test setup

  void it('confirmed event removes read mode for shopping cart with applied discount', () => {
    const couponId = uuid();

    return given(
      eventsInStream(shoppingCartId, [
        {
          type: 'ProductItemAdded',
          data: {
            productItem: { unitPrice: 100, productId: 'shoes', quantity: 100 },
          },
        },
        {
          type: 'DiscountApplied',
          data: { percent: 10, couponId },
        },
      ]),
    )
      .when(
        newEventsInStream(shoppingCartId, [
          {
            type: 'ShoppingCartConfirmed',
            data: { confirmedAt: new Date() },
          },
        ]),
      )
      .then(
        expectPongoDocuments
          .fromCollection<ShoppingCartShortInfo>(
            shoppingCartShortInfoCollectionName,
          )
          .withId(shoppingCartId)
          .notToExist(), // <= see this
      );
  });
});
The pattern looks the same, but the assertion is different.
I hope that this shows you how powerful the combination of Emmett, Pongo, and PostgreSQL is. We want to give you certainty and trust in the software you're building. Having built-in support for tests should help you with that.
Querying Read Models in the Web API
Now that we have projections running, let's make them available through our API. Update your shopping cart API setup to include Pongo:
export const shoppingCartApi =
  (
    eventStore: EventStore,
    pongo: PongoClient,
    getUnitPrice: (productId: string) => Promise<number>,
  ): WebApiSetup =>
  (router: Router) => {
    const handle = CommandHandler(shoppingCartHandlers, eventStore);
    const shoppingCartsSummary = pongo
      .db()
      .collection<ShoppingCartSummary>('shopping_carts_summary');

    // ... existing endpoints for commands ...

    // Get shopping cart summary
    router.get(
      '/clients/:clientId/shopping-carts/:shoppingCartId/summary',
      on(async (request: Request) => {
        const shoppingCartId = assertNotEmptyString(
          request.params.shoppingCartId,
        );

        const summary = await shoppingCartsSummary.findOne({
          _id: shoppingCartId,
        });

        if (!summary) {
          return notFound({ detail: 'Shopping cart not found' });
        }

        return ok(summary);
      }),
    );

    // List all shopping carts with filters
    router.get(
      '/clients/:clientId/shopping-carts',
      on(async (request: Request) => {
        const minAmount = request.query.minAmount
          ? parseFloat(request.query.minAmount as string)
          : undefined;

        const query = minAmount ? { totalAmount: { $gte: minAmount } } : {};

        const carts = await shoppingCartsSummary.find(query).toArray();

        return ok({ carts });
      }),
    );
  };
Remember to inject Pongo when setting up your API:
import { pongoClient } from '@event-driven-io/pongo';

const connectionString =
  process.env.POSTGRESQL_CONNECTION_STRING ??
  'postgresql://localhost:5432/postgres';

const pongo = pongoClient(connectionString);

const eventStore = getPostgreSQLEventStore(connectionString, {
  projections: projections.inline([
    shoppingCartSummaryProjection,
    clientShoppingSummaryProjection,
  ]),
});

const application = getApplication({
  apis: [
    shoppingCartApi(
      eventStore,
      pongo, // 👈
      getUnitPrice,
    ),
  ],
});
End-to-End Testing
Now, let met show you the final bit, so running end-to-end tests treating the WebApi as a black box.
Let's start with setting up our TestContainer again:
import {
  getPostgreSQLEventStore,
  type PostgresEventStore,
} from '@event-driven-io/emmett-postgresql';
import type { StartedPostgreSqlContainer } from '@testcontainers/postgresql';
import { PostgreSqlContainer } from '@testcontainers/postgresql';

void describe('ShoppingCart E2E', () => {
  let postgreSQLContainer: StartedPostgreSqlContainer;
  let eventStore: PostgresEventStore;

  // Set up a container and event store before all tests
  beforeAll(async () => {
    postgreSQLContainer = await new PostgreSqlContainer(
      'postgres:18.1',
    ).start();
    eventStore = getPostgreSQLEventStore(
      postgreSQLContainer.getConnectionUri(),
    );
  });

  // Close PostgreSQL connection and stop container once we finished testing
  afterAll(async () => {
    await eventStore.close();
    return postgreSQLContainer.stop();
  });
  // (...) Tests will go here
});
Event store lifetime
The PostgreSQL event store creates an internal connection pool to use PostgreSQL efficiently. Because of that, we recommend using a single event store instance per application. The same advice applies to other storages.
After the application ends or tests are finished, we need to close it to gracefully release open connections in the connection pool.
And create our test specification using the ApiE2ESpecification type:
import {
  ApiE2ESpecification,
  getApplication,
} from '@event-driven-io/emmett-expressjs';

const given = ApiE2ESpecification.for({
  getEventStore: () => eventStore,
  getApplication: (eventStore) =>
    getApplication({
      apis: [
        shoppingCartApi(
          eventStore,
          () => Promise.resolve(unitPrice),
          () => now,
        ),
      ],
    }),
});
The test will look accordingly to the integration tests, with the distinction that we also use HTTP requests for the setup. We're also checking only responses; we treat the WebApi as a black box.
import { expectResponse } from '@event-driven-io/emmett-expressjs';

void describe('When opened with product item', () => {
  const openedShoppingCartWithProduct: TestRequest = (request) =>
    request
      .post(`/clients/${clientId}/shopping-carts/current/product-items`)
      .send(productItem);

  void it('should confirm', () => {
    return given(openedShoppingCartWithProduct)
      .when((request) =>
        request.post(`/clients/${clientId}/shopping-carts/current/confirm`),
      )
      .then([expectResponse(204)]);
  });
});
Complete tests will look like this:
import {
  ApiE2ESpecification,
  expectResponse,
  getApplication,
  type TestRequest,
} from '@event-driven-io/emmett-expressjs';
import {
  getPostgreSQLEventStore,
  type PostgresEventStore,
} from '@event-driven-io/emmett-postgresql';
import {
  PostgreSqlContainer,
  type StartedPostgreSqlContainer,
} from '@testcontainers/postgresql';
import { randomUUID } from 'node:crypto';

void describe('ShoppingCart E2E', () => {
  const unitPrice = 100;
  let clientId: string;
  let shoppingCartId: string;
  let postgreSQLContainer: StartedPostgreSqlContainer;
  let eventStore: PostgresEventStore;
  let given: ApiE2ESpecification;

  beforeAll(async () => {
    postgreSQLContainer = await new PostgreSqlContainer(
      'postgres:18.1',
    ).start();
    eventStore = getPostgreSQLEventStore(
      postgreSQLContainer.getConnectionUri(),
    );

    given = ApiE2ESpecification.for({
      getEventStore: () => eventStore,
      getApplication: (eventStore) =>
        getApplication({
          apis: [
            shoppingCartApi(
              eventStore,
              () => Promise.resolve(unitPrice),
              () => now,
            ),
          ],
        }),
    });
  });

  beforeEach(() => {
    clientId = randomUUID();
    shoppingCartId = `shopping_cart:${clientId}:current`;
  });

  afterAll(async () => {
    await eventStore.close();
    return postgreSQLContainer.stop();
  });

  void describe('When opened with product item', () => {
    const openedShoppingCartWithProduct: TestRequest = (request) =>
      request
        .post(`/clients/${clientId}/shopping-carts/current/product-items`)
        .send(productItem);

    void it('should confirm', () =>
      given(openedShoppingCartWithProduct)
        .when((request) =>
          request.post(`/clients/${clientId}/shopping-carts/current/confirm`),
        )
        .then([expectResponse(204)]));

    void it('returns details', () =>
      given(openedShoppingCartWithProduct)
        .when((request) =>
          request.get(`/clients/${clientId}/shopping-carts/current`).send(),
        )
        .then([
          expectResponse(200, {
            body: {
              clientId,
              id: shoppingCartId,
              productItems: [
                {
                  quantity: productItem.quantity,
                  productId: productItem.productId,
                },
              ],
              status: ShoppingCartStatus.Opened,
            },
          }),
        ]));
  });

  const now = new Date();

  const getRandomProduct = (): PricedProductItem => {
    return {
      productId: randomUUID(),
      unitPrice: unitPrice,
      quantity: Math.random() * 10,
    };
  };

  const productItem = getRandomProduct();
});
Check also the full sample in Emmett repository.